

Start with a style. Finish with a production brief.
Use AI to explore your Mylar bag design, compare visual directions and explain your idea clearly—then confirm the pouch structure and prepare artwork for printing.
Can you design a Mylar bag with AI?
Yes. AI can help you explore colors, illustrations, typography and pouch mockups. Start with your product, audience, pouch format and brand details; generate one design direction at a time; then place approved artwork on the supplier’s final dieline. An AI mockup is a concept, not a print-ready file or proof that a window, finish or shape can be manufactured.
This guide gives you eight style directions, reusable prompts, a size reference and a practical handoff checklist for custom Mylar bags.
| Decision | What to confirm |
|---|---|
| Best use of AI | Visual exploration and communicating a design direction—not automatic label approval. |
| Starting files | Brand name, logo, product details, preferred style and approximate pouch format. |
| Final artwork | Supplier-approved dieline, editable text where possible, confirmed copy, colors and print areas. |
| Dimensions below | Millimeters; W × H + G. G is the single-side bottom fold, not the full unfolded gusset depth. |
| Reference quantities | The supplied reference range lists digital printing from about 500 pieces. Some small-format gravure specifications can require around 100,000 pieces; confirm each project. |
| Runlong assistance | AI images can be reviewed for image enhancement and basic layout assistance. Complex original design or difficult reconstruction requires separate confirmation. |
1. Write a packaging brief before generating images
A good-looking pouch can still be wrong for your product. Decide what the customer needs to recognize first: your brand, the product name or a particular variant. Keep the main panel focused rather than asking AI to fill every space.
| Brief field | Fill in your answer |
|---|---|
| Product and customer | [What is inside? Who is buying it? Where will it be sold?] |
| Brand and product name | [Exact spelling; attach your own logo if available] |
| Pouch format | [Flat / stand-up / custom-shaped; zipper, tear notch or hang hole] |
| Size and fill | [Width × height + single-side bottom fold; intended fill weight] |
| Style and colors | [One style, two or three principal colors, preferred finish] |
| Information hierarchy | [Brand → product → variant → supporting information] |
| Commercial brief | [Quantity per design, number of SKUs and destination market] |
“Mylar bag” is a common buyer search term, not a complete material specification. Confirm the actual laminate and product-protection needs separately; a silver-looking image does not establish aluminum foil content or barrier performance.
2. Choose a Mylar bag design style and adapt the prompt
The images below are AI-assisted packaging design concepts, not photographs of completed customer orders. Use the visual direction as inspiration and replace bracketed fields with your own brand and approved product information. The prompts are starting points, not guarantees of identical results.
How to use: copy one complete style prompt, replace every bracketed field, attach your logo or a reference image if available, and paste it into an AI image-generation tool such as ChatGPT or Gemini with image generation enabled. Each style prompt works independently. For flat bags, mark the bottom fold as not applicable. Results vary by tool: expect to refine the concept and manually verify all lettering.
Copy buttons copy the entire prompt, even when its text is collapsed. Open “Show / hide full prompt” to read or customize it before using it.
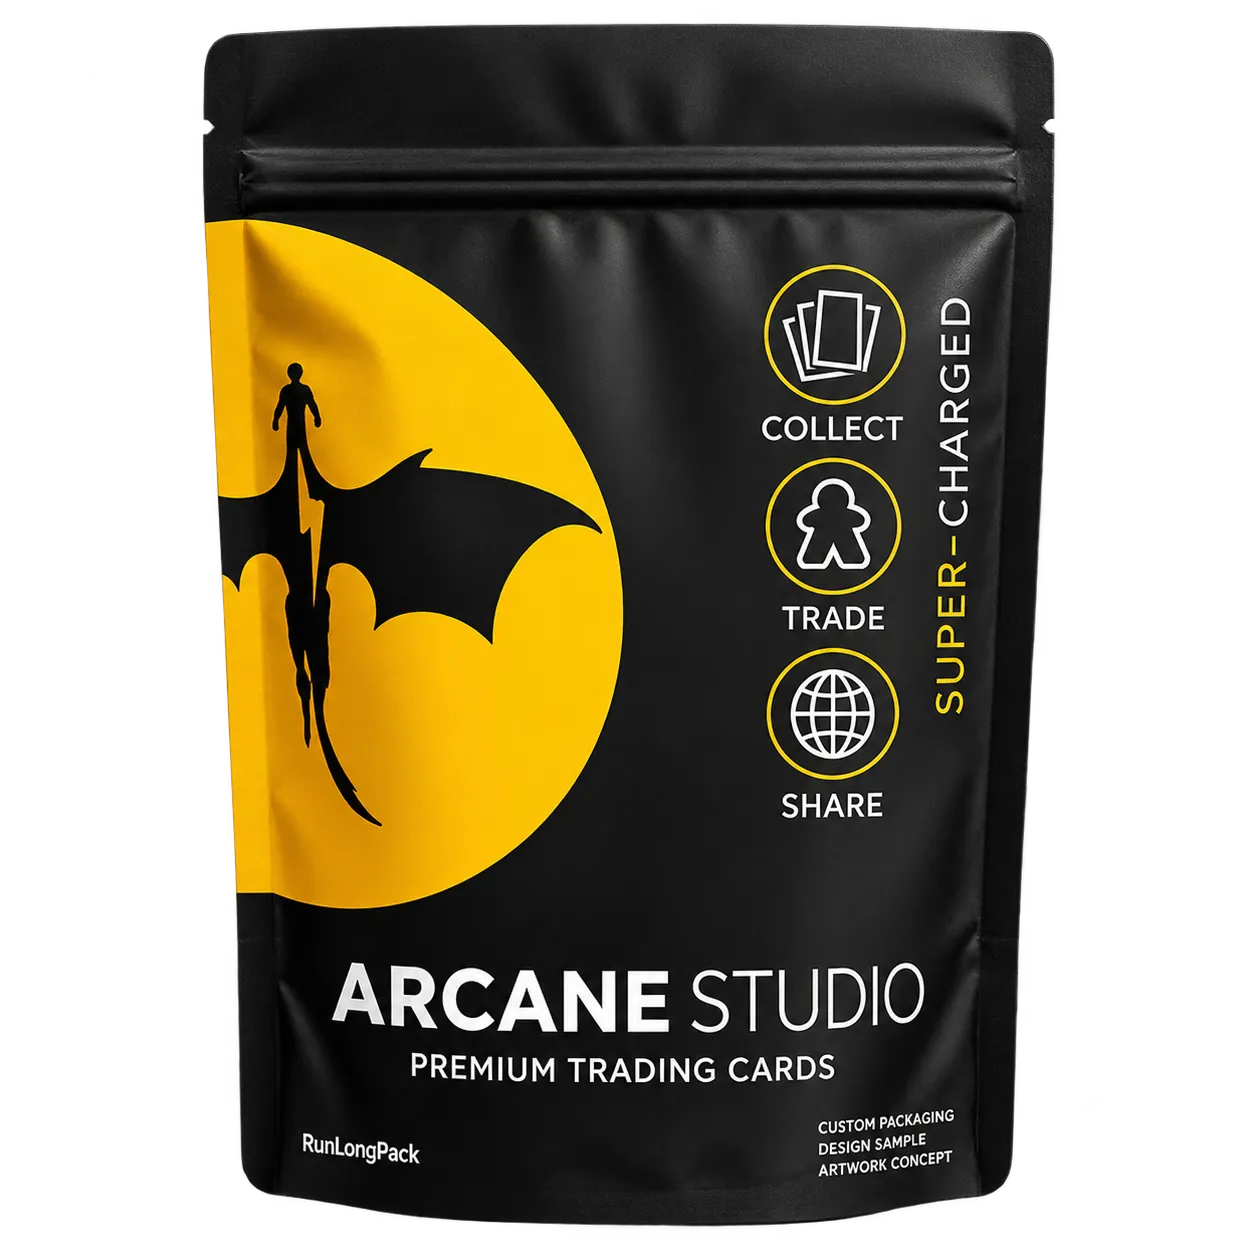
A. Minimal black & gold
Useful when the product name and a strong symbol should carry the design. Ask for gold-colored print first; actual metallic effects are a separate production choice.
Show / hide full prompt
Create one custom Mylar pouch concept for [PRODUCT], branded “[BRAND]”. Use matte black, warm gold-colored typography and one simple emblem. Clear hierarchy: brand, product, variant. Generous negative space. One complete front-facing pouch, realistic flexible-film folds, light studio background. No added certifications or unapproved claims.

CUSTOMIZE BEFORE GENERATING:
Exact front text: brand "[BRAND]"; product "[PRODUCT]"; variant "[VARIANT OR OMIT]"; net content "[APPROVED NET CONTENT OR OMIT]". Replace these fields before generating; do not print brackets or instructions on the pouch.
Customer and sales market: [ADULT CUSTOMER PROFILE / COUNTRY].
Structure: [STAND-UP BOTTOM-GUSSET POUCH / FLAT POUCH / CUSTOM SHAPE], with [ZIPPER OR NO ZIPPER]. Approximate proportions: [WIDTH] mm × [HEIGHT] mm; single-side bottom fold [G] mm, or not applicable for flat pouches. Dimensions guide the silhouette only; do not print measurements or add dimension arrows.
Use an attached owned logo without redesigning it. If no logo is supplied, use a clean typographic brand name. Use an attached reference only for its palette, composition and visual mood; replace its brand and product wording with mine.
Make the brand and product name readable at thumbnail size. Use a clear primary headline and smaller variant and net-content lines. Keep essential wording visually clear of the top seal, zipper, side seals and bottom fold; do not invent a technical dieline or numerical seal allowances.
Render ONE complete pouch, centered and large in the frame, with a small clear margin around all edges. Straight-on front view, white or very light warm studio background, soft contact shadow, realistic laminated flexible-film creases and sealed edges. No loose products, hands, props, extra pouch, collage, watermark or text outside the package. Do not create a rigid box or kraft-paper surface unless specifically requested.
Use only the approved text above. Do not invent small-print copy, QR codes, barcodes, certification logos, nutrition panels or legal claims; leave the back-label information for a later verified layout. If exact text cannot be rendered, keep that area clean for manual typesetting.
Generate one original design concept image, not a mood board. The image is not a print-ready file. If required brand or product fields remain unspecified, ask me to fill them in first.
B. Botanical & natural
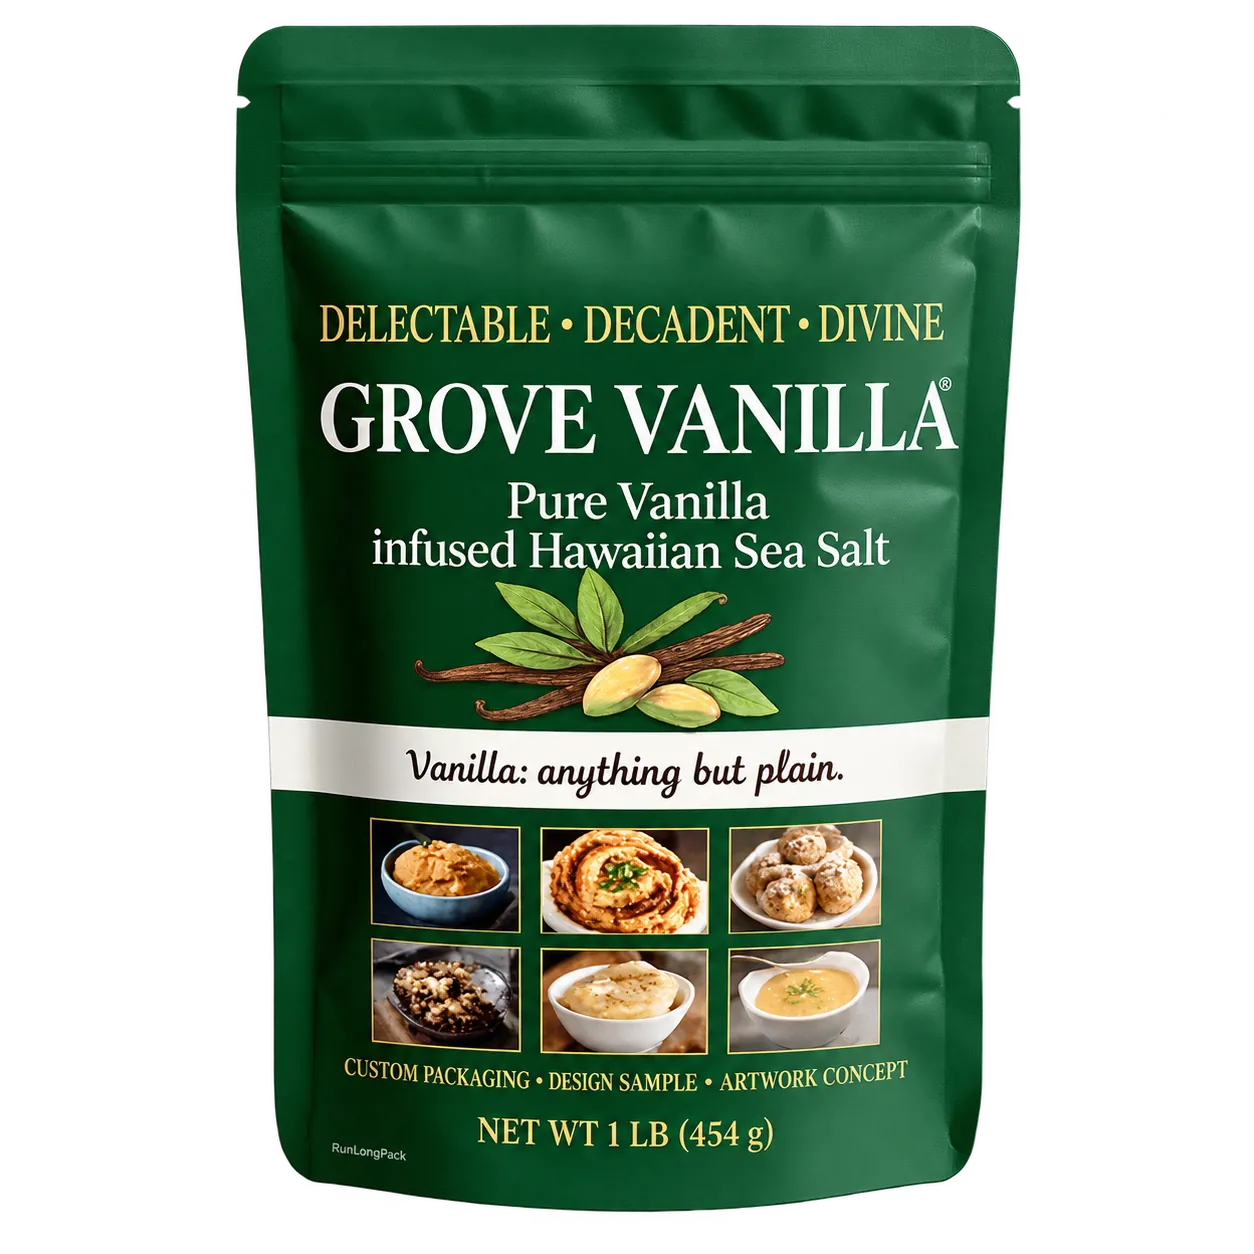
Use plant illustration to communicate an ingredient or visual identity. Natural-looking artwork does not mean the packaging is compostable or the product is organic.
Show / hide full prompt
Design one [POUCH FORMAT] for “[BRAND]” and “[PRODUCT]”. Use forest green, cream and muted gold, delicate [INGREDIENT] botanical illustration and readable serif typography. Keep the product name prominent. Realistic complete pouch, subtle film folds, white background. Do not add organic, recyclable or health claims.

CUSTOMIZE BEFORE GENERATING:
Exact front text: brand "[BRAND]"; product "[PRODUCT]"; variant "[VARIANT OR OMIT]"; net content "[APPROVED NET CONTENT OR OMIT]". Replace these fields before generating; do not print brackets or instructions on the pouch.
Customer and sales market: [ADULT CUSTOMER PROFILE / COUNTRY].
Structure: [STAND-UP BOTTOM-GUSSET POUCH / FLAT POUCH / CUSTOM SHAPE], with [ZIPPER OR NO ZIPPER]. Approximate proportions: [WIDTH] mm × [HEIGHT] mm; single-side bottom fold [G] mm, or not applicable for flat pouches. Dimensions guide the silhouette only; do not print measurements or add dimension arrows.
Use an attached owned logo without redesigning it. If no logo is supplied, use a clean typographic brand name. Use an attached reference only for its palette, composition and visual mood; replace its brand and product wording with mine.
Make the brand and product name readable at thumbnail size. Use a clear primary headline and smaller variant and net-content lines. Keep essential wording visually clear of the top seal, zipper, side seals and bottom fold; do not invent a technical dieline or numerical seal allowances.
Render ONE complete pouch, centered and large in the frame, with a small clear margin around all edges. Straight-on front view, white or very light warm studio background, soft contact shadow, realistic laminated flexible-film creases and sealed edges. No loose products, hands, props, extra pouch, collage, watermark or text outside the package. Do not create a rigid box or kraft-paper surface unless specifically requested.
Use only the approved text above. Do not invent small-print copy, QR codes, barcodes, certification logos, nutrition panels or legal claims; leave the back-label information for a later verified layout. If exact text cannot be rendered, keep that area clean for manual typesetting.
Generate one original design concept image, not a mood board. The image is not a print-ready file. If required brand or product fields remain unspecified, ask me to fill them in first.
C. Neon & sci-fi
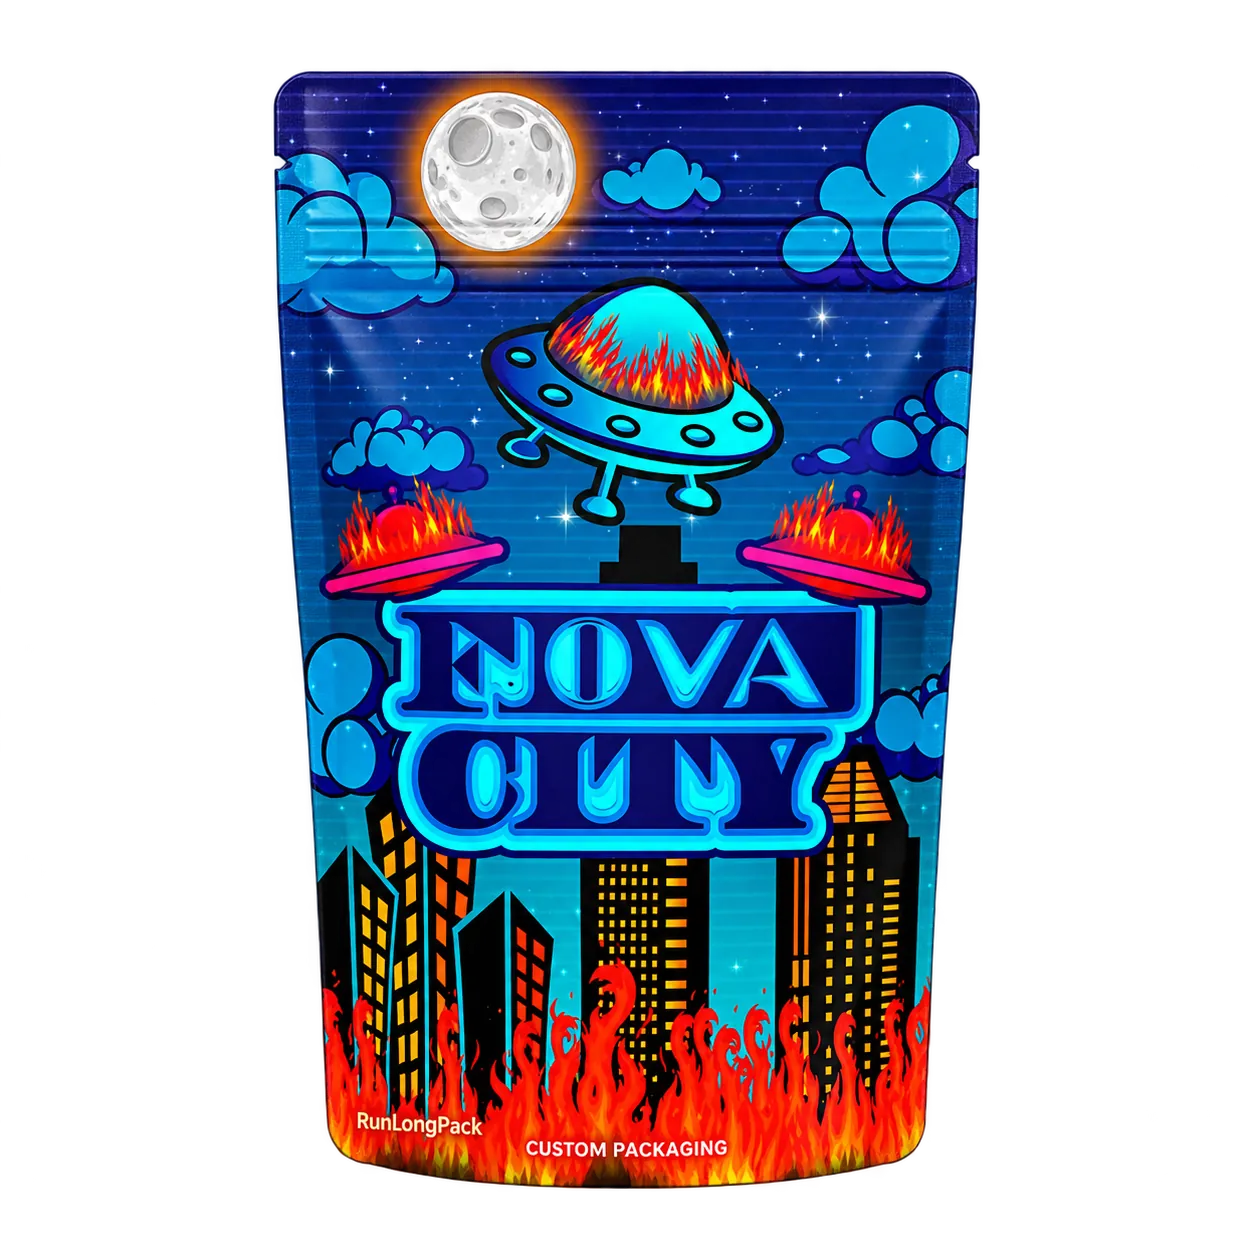
A distinctive direction for an adult-oriented brand that wants a dramatic shelf presence. Limit bright accents so the name remains readable at thumbnail size.
Show / hide full prompt
Create a single pouch design for “[BRAND]”, product “[PRODUCT]”, aimed at [ADULT AUDIENCE]. Deep navy base, cyan and orange neon accents, an original futuristic city illustration. Reserve a clean central title panel. Preserve legible brand and product text. Full pouch visible, realistic zipper and sealed edges, light background. No extra products or claims.

CUSTOMIZE BEFORE GENERATING:
Exact front text: brand "[BRAND]"; product "[PRODUCT]"; variant "[VARIANT OR OMIT]"; net content "[APPROVED NET CONTENT OR OMIT]". Replace these fields before generating; do not print brackets or instructions on the pouch.
Customer and sales market: [ADULT CUSTOMER PROFILE / COUNTRY].
Structure: [STAND-UP BOTTOM-GUSSET POUCH / FLAT POUCH / CUSTOM SHAPE], with [ZIPPER OR NO ZIPPER]. Approximate proportions: [WIDTH] mm × [HEIGHT] mm; single-side bottom fold [G] mm, or not applicable for flat pouches. Dimensions guide the silhouette only; do not print measurements or add dimension arrows.
Use an attached owned logo without redesigning it. If no logo is supplied, use a clean typographic brand name. Use an attached reference only for its palette, composition and visual mood; replace its brand and product wording with mine.
Make the brand and product name readable at thumbnail size. Use a clear primary headline and smaller variant and net-content lines. Keep essential wording visually clear of the top seal, zipper, side seals and bottom fold; do not invent a technical dieline or numerical seal allowances.
Render ONE complete pouch, centered and large in the frame, with a small clear margin around all edges. Straight-on front view, white or very light warm studio background, soft contact shadow, realistic laminated flexible-film creases and sealed edges. No loose products, hands, props, extra pouch, collage, watermark or text outside the package. Do not create a rigid box or kraft-paper surface unless specifically requested.
Use only the approved text above. Do not invent small-print copy, QR codes, barcodes, certification logos, nutrition panels or legal claims; leave the back-label information for a later verified layout. If exact text cannot be rendered, keep that area clean for manual typesetting.
Generate one original design concept image, not a mood board. The image is not a print-ready file. If required brand or product fields remain unspecified, ask me to fill them in first.
D. Holographic-look & cosmic
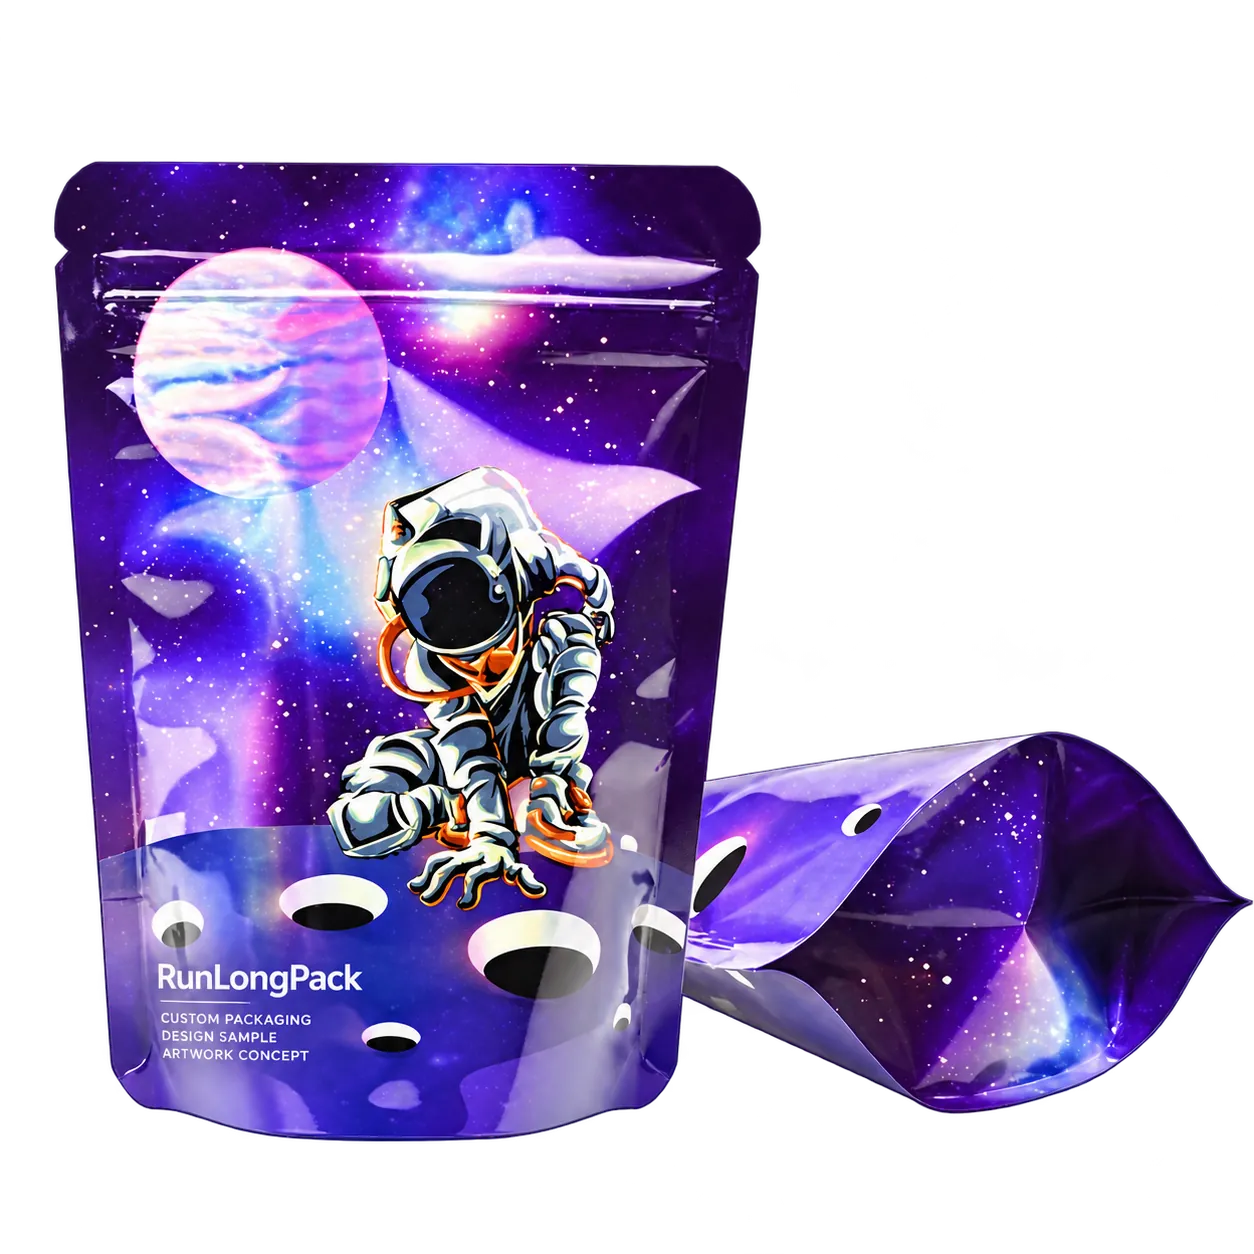
Show the intended effect, but ask your supplier which laminate, print coverage and white-ink treatment can produce it. An AI rainbow reflection is not a material specification.
Show / hide full prompt
Create one custom pouch concept for “[BRAND]” with a violet cosmic palette, restrained star patterns and a holographic-looking surface. Keep “[PRODUCT]” on an uncluttered, high-contrast panel. Show realistic flexible packaging, not a rigid box. One complete pouch on a light background. Treat reflective effects as visual concepts, not certified material properties.

CUSTOMIZE BEFORE GENERATING:
Exact front text: brand "[BRAND]"; product "[PRODUCT]"; variant "[VARIANT OR OMIT]"; net content "[APPROVED NET CONTENT OR OMIT]". Replace these fields before generating; do not print brackets or instructions on the pouch.
Customer and sales market: [ADULT CUSTOMER PROFILE / COUNTRY].
Structure: [STAND-UP BOTTOM-GUSSET POUCH / FLAT POUCH / CUSTOM SHAPE], with [ZIPPER OR NO ZIPPER]. Approximate proportions: [WIDTH] mm × [HEIGHT] mm; single-side bottom fold [G] mm, or not applicable for flat pouches. Dimensions guide the silhouette only; do not print measurements or add dimension arrows.
Use an attached owned logo without redesigning it. If no logo is supplied, use a clean typographic brand name. Use an attached reference only for its palette, composition and visual mood; replace its brand and product wording with mine.
Make the brand and product name readable at thumbnail size. Use a clear primary headline and smaller variant and net-content lines. Keep essential wording visually clear of the top seal, zipper, side seals and bottom fold; do not invent a technical dieline or numerical seal allowances.
Render ONE complete pouch, centered and large in the frame, with a small clear margin around all edges. Straight-on front view, white or very light warm studio background, soft contact shadow, realistic laminated flexible-film creases and sealed edges. No loose products, hands, props, extra pouch, collage, watermark or text outside the package. Do not create a rigid box or kraft-paper surface unless specifically requested.
Use only the approved text above. Do not invent small-print copy, QR codes, barcodes, certification logos, nutrition panels or legal claims; leave the back-label information for a later verified layout. If exact text cannot be rendered, keep that area clean for manual typesetting.
Generate one original design concept image, not a mood board. The image is not a print-ready file. If required brand or product fields remain unspecified, ask me to fill them in first.
E. Fruit-led retail color
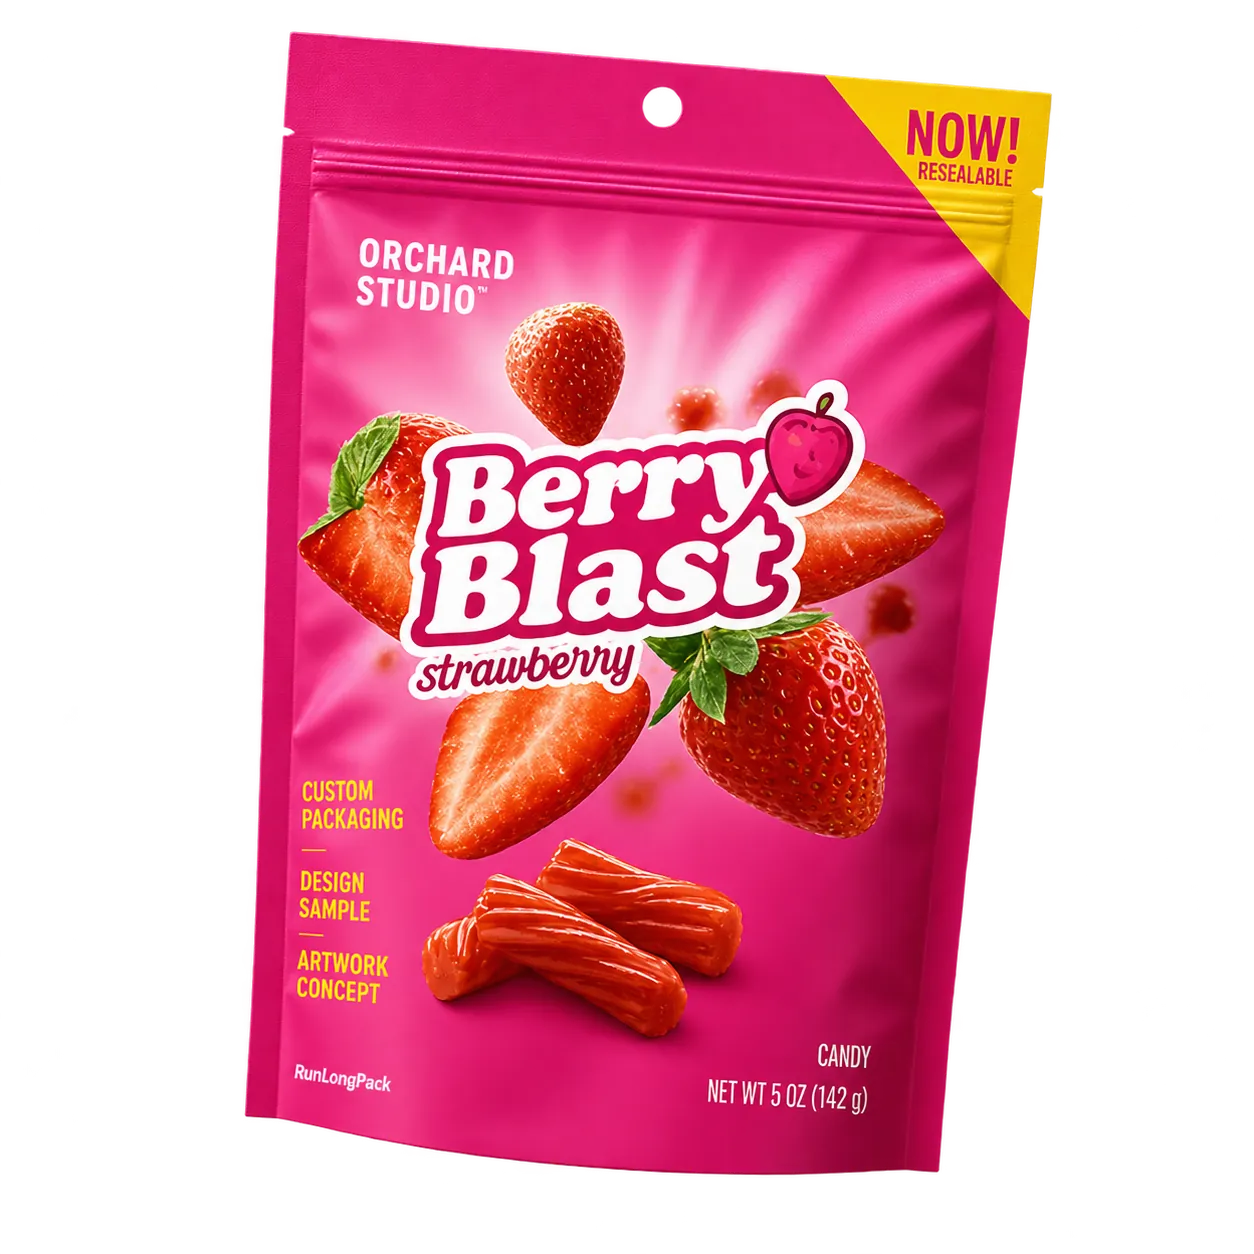
For ordinary food products, one dominant flavor color can help shoppers identify a variant. Use the correct ingredient imagery and verified product wording.
Show / hide full prompt
Design one retail pouch for [ORDINARY FOOD PRODUCT], brand “[BRAND]”, flavor “[FLAVOR]”. Use [MAIN COLOR], realistic [FRUIT] imagery and bold readable product typography. Keep a consistent space for variant information. Complete pouch, realistic film texture, clean background. Do not invent nutrition facts, ingredient claims or certifications.

CUSTOMIZE BEFORE GENERATING:
Exact front text: brand "[BRAND]"; product "[PRODUCT]"; variant "[VARIANT OR OMIT]"; net content "[APPROVED NET CONTENT OR OMIT]". Replace these fields before generating; do not print brackets or instructions on the pouch.
Customer and sales market: [ADULT CUSTOMER PROFILE / COUNTRY].
Structure: [STAND-UP BOTTOM-GUSSET POUCH / FLAT POUCH / CUSTOM SHAPE], with [ZIPPER OR NO ZIPPER]. Approximate proportions: [WIDTH] mm × [HEIGHT] mm; single-side bottom fold [G] mm, or not applicable for flat pouches. Dimensions guide the silhouette only; do not print measurements or add dimension arrows.
Use an attached owned logo without redesigning it. If no logo is supplied, use a clean typographic brand name. Use an attached reference only for its palette, composition and visual mood; replace its brand and product wording with mine.
Make the brand and product name readable at thumbnail size. Use a clear primary headline and smaller variant and net-content lines. Keep essential wording visually clear of the top seal, zipper, side seals and bottom fold; do not invent a technical dieline or numerical seal allowances.
Render ONE complete pouch, centered and large in the frame, with a small clear margin around all edges. Straight-on front view, white or very light warm studio background, soft contact shadow, realistic laminated flexible-film creases and sealed edges. No loose products, hands, props, extra pouch, collage, watermark or text outside the package. Do not create a rigid box or kraft-paper surface unless specifically requested.
Use only the approved text above. Do not invent small-print copy, QR codes, barcodes, certification logos, nutrition panels or legal claims; leave the back-label information for a later verified layout. If exact text cannot be rendered, keep that area clean for manual typesetting.
Generate one original design concept image, not a mood board. The image is not a print-ready file. If required brand or product fields remain unspecified, ask me to fill them in first.
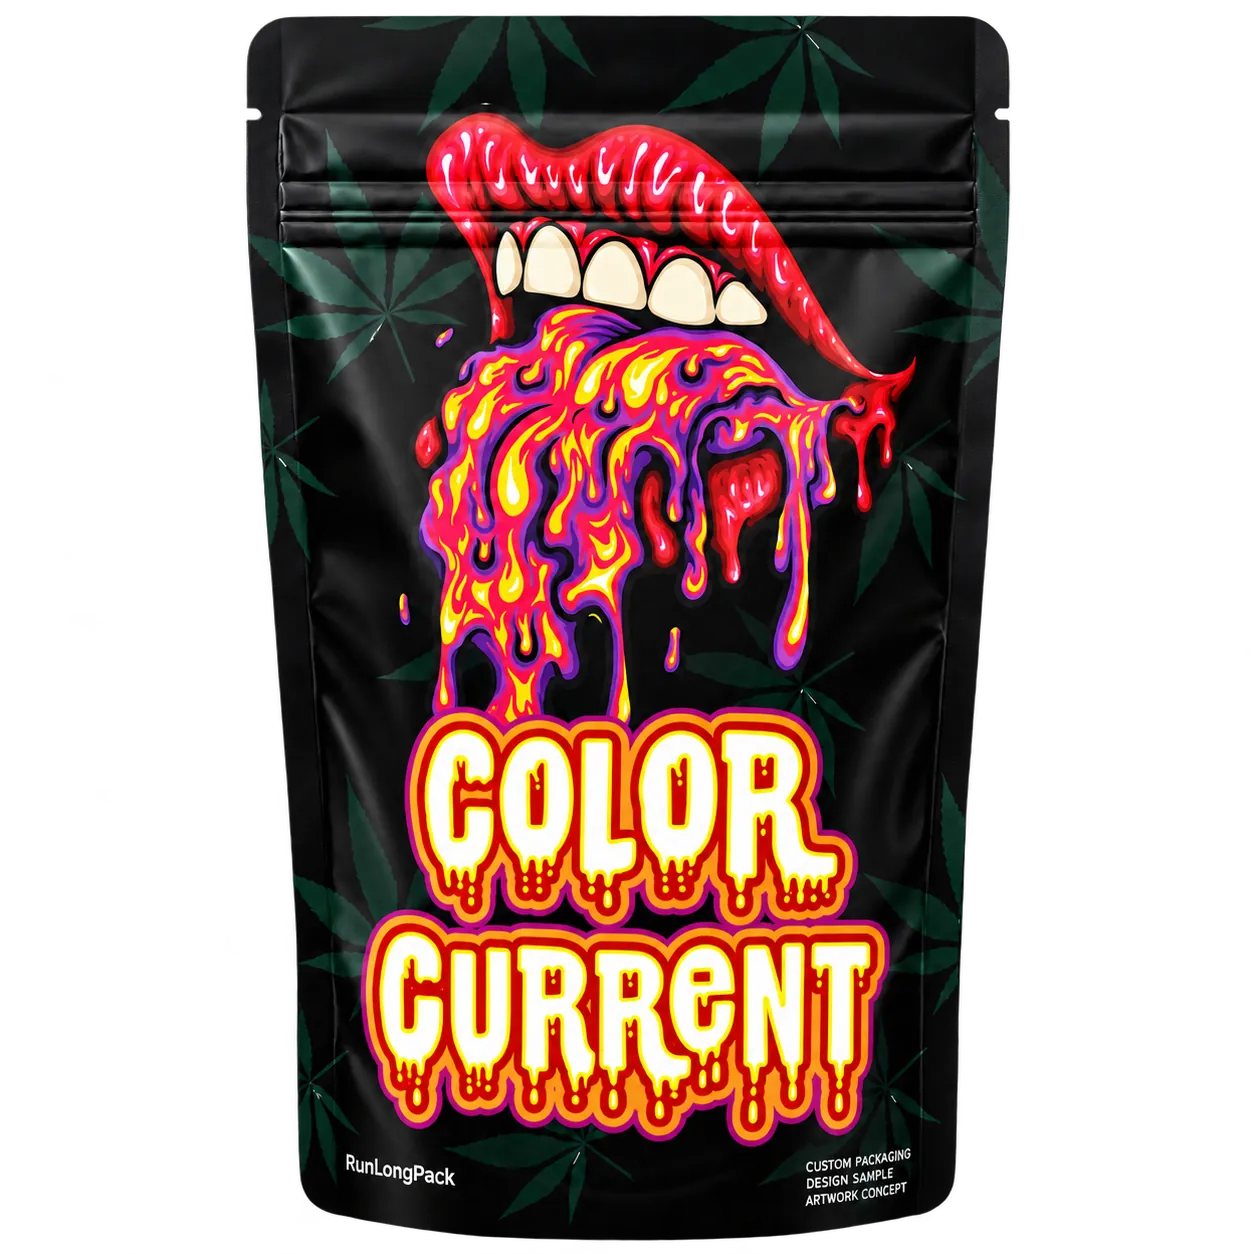
F. Pop art & expressive typography
Pick one visual motif instead of adding several competing illustrations. Check the smallest retail thumbnail: the title should still win over the background.
Show / hide full prompt
Create one expressive packaging concept for “[BRAND]” and “[PRODUCT]”. Black base, magenta and yellow accent colors, one original [VISUAL MOTIF], and a bold outlined headline. Keep supporting text minimal and readable. Preserve a clear brand area. One complete realistic pouch, no props, no extra logos, no unsupported claims.

CUSTOMIZE BEFORE GENERATING:
Exact front text: brand "[BRAND]"; product "[PRODUCT]"; variant "[VARIANT OR OMIT]"; net content "[APPROVED NET CONTENT OR OMIT]". Replace these fields before generating; do not print brackets or instructions on the pouch.
Customer and sales market: [ADULT CUSTOMER PROFILE / COUNTRY].
Structure: [STAND-UP BOTTOM-GUSSET POUCH / FLAT POUCH / CUSTOM SHAPE], with [ZIPPER OR NO ZIPPER]. Approximate proportions: [WIDTH] mm × [HEIGHT] mm; single-side bottom fold [G] mm, or not applicable for flat pouches. Dimensions guide the silhouette only; do not print measurements or add dimension arrows.
Use an attached owned logo without redesigning it. If no logo is supplied, use a clean typographic brand name. Use an attached reference only for its palette, composition and visual mood; replace its brand and product wording with mine.
Make the brand and product name readable at thumbnail size. Use a clear primary headline and smaller variant and net-content lines. Keep essential wording visually clear of the top seal, zipper, side seals and bottom fold; do not invent a technical dieline or numerical seal allowances.
Render ONE complete pouch, centered and large in the frame, with a small clear margin around all edges. Straight-on front view, white or very light warm studio background, soft contact shadow, realistic laminated flexible-film creases and sealed edges. No loose products, hands, props, extra pouch, collage, watermark or text outside the package. Do not create a rigid box or kraft-paper surface unless specifically requested.
Use only the approved text above. Do not invent small-print copy, QR codes, barcodes, certification logos, nutrition panels or legal claims; leave the back-label information for a later verified layout. If exact text cannot be rendered, keep that area clean for manual typesetting.
Generate one original design concept image, not a mood board. The image is not a print-ready file. If required brand or product fields remain unspecified, ask me to fill them in first.
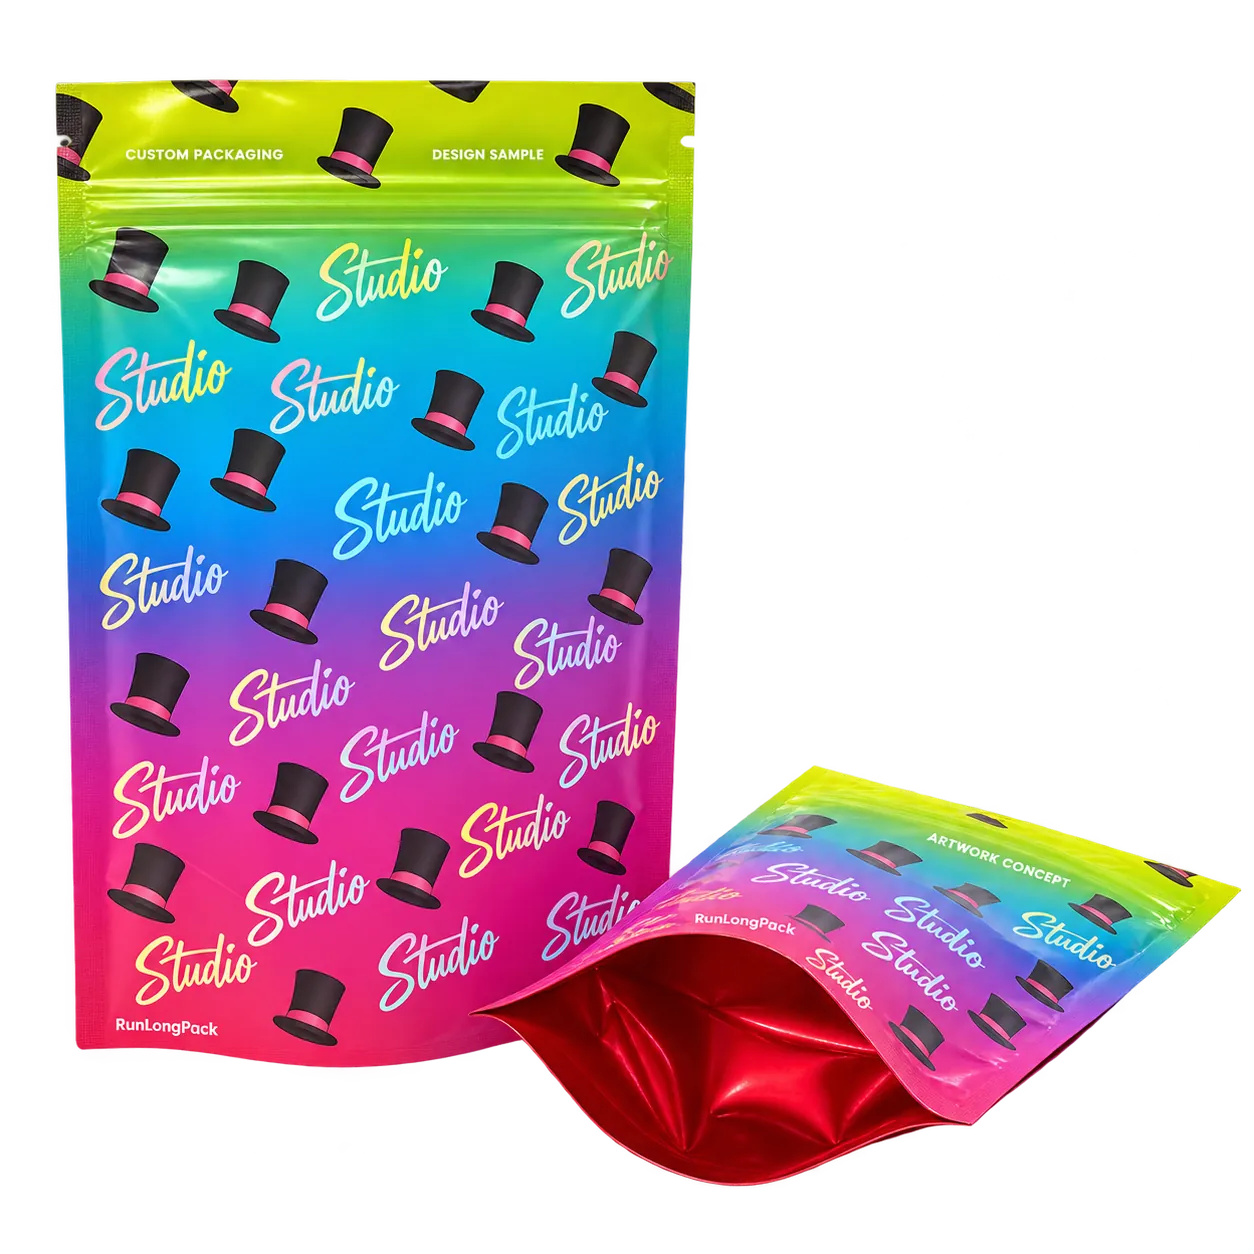
G. Gradient & repeating pattern
Useful for a coordinated range. Keep the logo position, type size and information layout stable; change a controlled color or motif for each SKU.
Show / hide full prompt
Design one pouch for “[BRAND]”, “[PRODUCT]”. Use a smooth [COLOR A] to [COLOR B] gradient with a repeating original [MOTIF]. Add a clean solid-color label area for readable product text. Keep the pattern away from small copy. Full pouch visible, realistic zipper and flexible film, white background. No invented marks or claims.

CUSTOMIZE BEFORE GENERATING:
Exact front text: brand "[BRAND]"; product "[PRODUCT]"; variant "[VARIANT OR OMIT]"; net content "[APPROVED NET CONTENT OR OMIT]". Replace these fields before generating; do not print brackets or instructions on the pouch.
Customer and sales market: [ADULT CUSTOMER PROFILE / COUNTRY].
Structure: [STAND-UP BOTTOM-GUSSET POUCH / FLAT POUCH / CUSTOM SHAPE], with [ZIPPER OR NO ZIPPER]. Approximate proportions: [WIDTH] mm × [HEIGHT] mm; single-side bottom fold [G] mm, or not applicable for flat pouches. Dimensions guide the silhouette only; do not print measurements or add dimension arrows.
Use an attached owned logo without redesigning it. If no logo is supplied, use a clean typographic brand name. Use an attached reference only for its palette, composition and visual mood; replace its brand and product wording with mine.
Make the brand and product name readable at thumbnail size. Use a clear primary headline and smaller variant and net-content lines. Keep essential wording visually clear of the top seal, zipper, side seals and bottom fold; do not invent a technical dieline or numerical seal allowances.
Render ONE complete pouch, centered and large in the frame, with a small clear margin around all edges. Straight-on front view, white or very light warm studio background, soft contact shadow, realistic laminated flexible-film creases and sealed edges. No loose products, hands, props, extra pouch, collage, watermark or text outside the package. Do not create a rigid box or kraft-paper surface unless specifically requested.
Use only the approved text above. Do not invent small-print copy, QR codes, barcodes, certification logos, nutrition panels or legal claims; leave the back-label information for a later verified layout. If exact text cannot be rendered, keep that area clean for manual typesetting.
Generate one original design concept image, not a mood board. The image is not a print-ready file. If required brand or product fields remain unspecified, ask me to fill them in first.
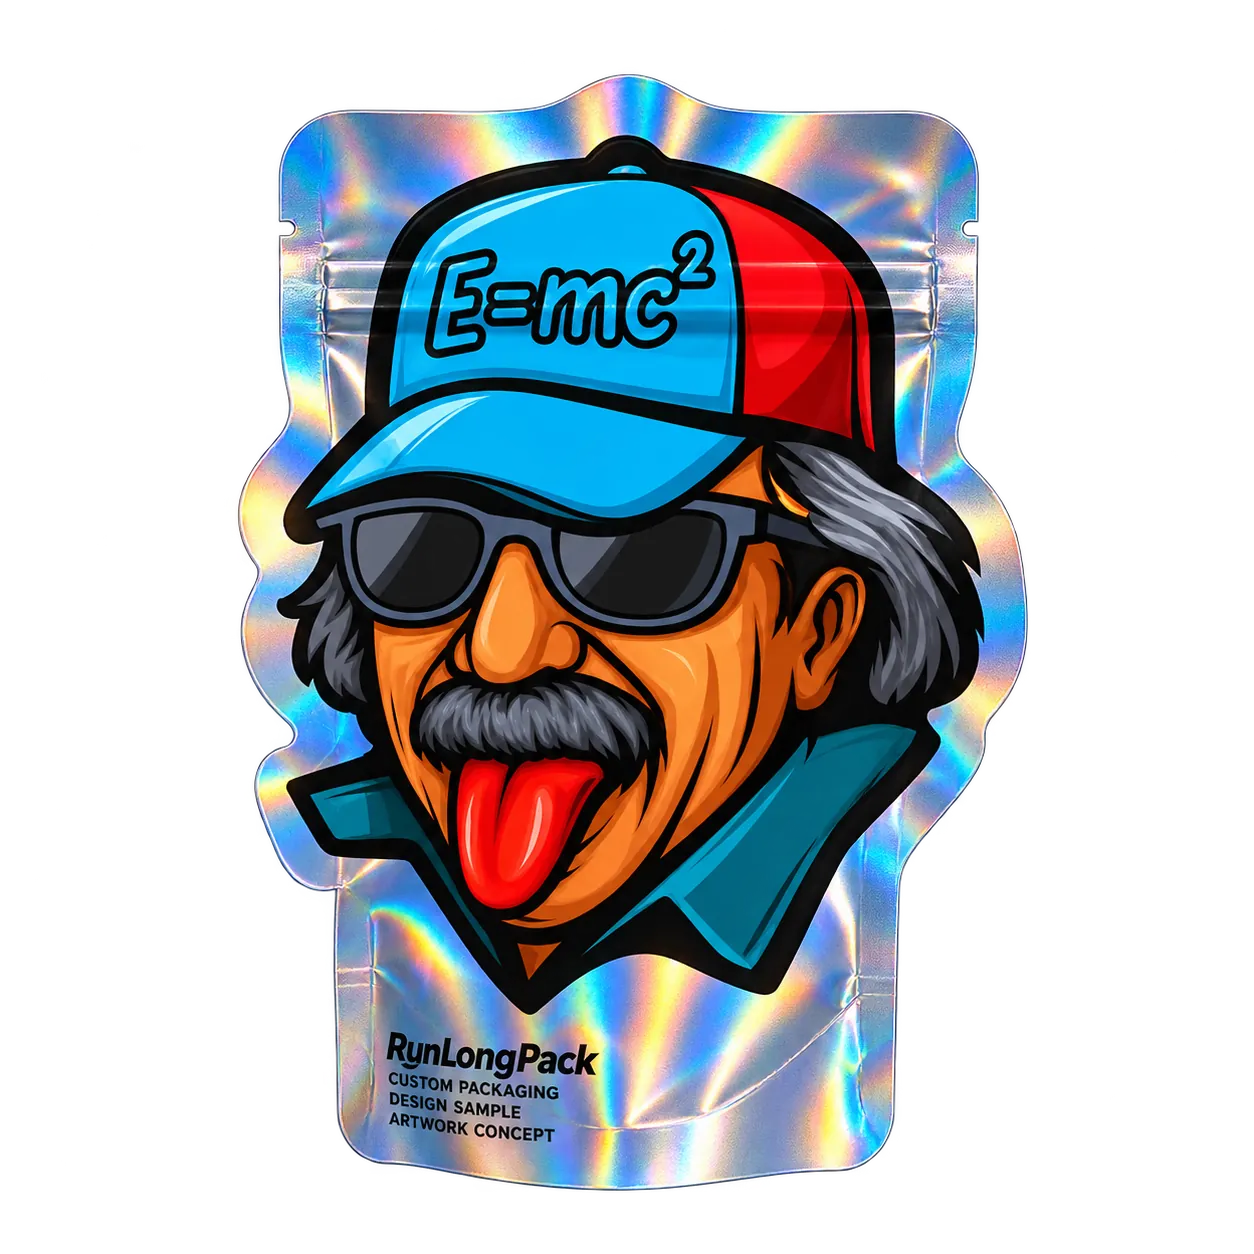
H. Custom-shaped silhouette
Start with a simple contour and generous space for the seal and opening. Complex narrow corners can make the design harder to convert into a practical pouch. Explore custom-shaped pouch options before locking the illustration.
Show / hide full prompt
Create one custom-shaped pouch concept for “[BRAND]” using an original [SUBJECT] silhouette and [PALETTE]. Keep the outline simple, with room around the illustration for a continuous sealed edge and a practical top opening. Place the brand naturally on the front. Show the complete pouch on a light background. No promise of production feasibility.

CUSTOMIZE BEFORE GENERATING:
Exact front text: brand "[BRAND]"; product "[PRODUCT]"; variant "[VARIANT OR OMIT]"; net content "[APPROVED NET CONTENT OR OMIT]". Replace these fields before generating; do not print brackets or instructions on the pouch.
Customer and sales market: [ADULT CUSTOMER PROFILE / COUNTRY].
Structure: [STAND-UP BOTTOM-GUSSET POUCH / FLAT POUCH / CUSTOM SHAPE], with [ZIPPER OR NO ZIPPER]. Approximate proportions: [WIDTH] mm × [HEIGHT] mm; single-side bottom fold [G] mm, or not applicable for flat pouches. Dimensions guide the silhouette only; do not print measurements or add dimension arrows.
Use an attached owned logo without redesigning it. If no logo is supplied, use a clean typographic brand name. Use an attached reference only for its palette, composition and visual mood; replace its brand and product wording with mine.
Make the brand and product name readable at thumbnail size. Use a clear primary headline and smaller variant and net-content lines. Keep essential wording visually clear of the top seal, zipper, side seals and bottom fold; do not invent a technical dieline or numerical seal allowances.
Render ONE complete pouch, centered and large in the frame, with a small clear margin around all edges. Straight-on front view, white or very light warm studio background, soft contact shadow, realistic laminated flexible-film creases and sealed edges. No loose products, hands, props, extra pouch, collage, watermark or text outside the package. Do not create a rigid box or kraft-paper surface unless specifically requested.
Use only the approved text above. Do not invent small-print copy, QR codes, barcodes, certification logos, nutrition panels or legal claims; leave the back-label information for a later verified layout. If exact text cannot be rendered, keep that area clean for manual typesetting.
Generate one original design concept image, not a mood board. The image is not a print-ready file. If required brand or product fields remain unspecified, ask me to fill them in first.
3. Copy this complete AI packaging design prompt
Use this template when you want a consistent product mockup rather than a mood board. Replace every bracketed field; if a detail is unknown, leave space for it instead of asking AI to invent it.
Show / hide full prompt
Purpose: Create a visual concept for custom printed flexible packaging.
Brand: [EXACT BRAND NAME]
Product: [EXACT PRODUCT NAME]
Audience and market: [CUSTOMER / COUNTRY OR REGION]
Format: [STAND-UP OR FLAT POUCH], [ZIPPER / NO ZIPPER]
Reference size: [W] mm wide × [H] mm high + [G] mm single-side bottom fold.
Style: [CHOSEN STYLE]; colors: [PALETTE].
Front hierarchy: brand first, product second, variant third.
Approved text only: [PASTE YOUR APPROVED COPY].
Artwork: [DESCRIBE THE MAIN MOTIF OR INGREDIENT IMAGE].
Finish appearance: [MATTE / GLOSS / METALLIC-LOOK CONCEPT].
Show ONE complete pouch from top seal to base, front-facing or slight three-quarter angle. Realistic flexible-film folds and printing. No extra packages, props or collage. Light neutral background.
Keep key text away from seals, zipper and folds. Leave a reserved blank area for later verified label information. Do not invent barcodes, nutrition facts, certification marks, medical claims or legal text. This is a visual concept, not a dimensionally accurate dieline.

REFERENCE HANDLING: If I attach a style reference, identify its palette, typography hierarchy and composition, then apply those principles to my brand and product. Do not leave the reference's brand name on the bag. If I attach my own logo, retain its identity and proportions.
LAYOUT: One strong focal illustration, no competing headline blocks. Product name must remain legible at thumbnail size. Use only my approved wording. Omit unknown optional fields rather than printing placeholders.
PHYSICAL APPEARANCE: Match the requested flat or stand-up format; do not add a bottom gusset to a flat pouch. Realistic heat-sealed perimeter, zipper where specified, slight flexible-film wrinkles and natural reflections. Do not assume a silver surface proves a foil laminate.
OUTPUT: One front-view concept at the highest image resolution available in your tool. Center the complete pouch with a modest margin and soft shadow. No dimension arrows, background labels, props, second package or collage. Do not claim a specific DPI, CMYK output or editable vector file unless actually provided by the tool.
Before generating, ask for any missing essential brand, product or format information. For a cannabis product, use an adult-oriented visual direction rather than child-oriented or familiar candy-imitation styling; reserve space for market-specific labeling to be supplied separately.
For a second revision, change only one thing: “Keep the pouch shape, artwork and layout unchanged. Increase the product-name contrast and reduce the background pattern behind the wording.” This is easier to evaluate than asking for an entirely new design each time.
Save the selected image at its original download resolution. Keep the prompt and version name with it, and ask for a separate front and back concept if you need both. A flat artwork image may help explain your idea, but it still needs to be fitted to the approved dieline.
Refine the design without starting over
Attach the chosen image when using these follow-up prompts. Generate the back as a separate image; it is still a layout concept, not a verified label.
Improve readability
Show / hide full prompt
Edit the attached pouch concept. Keep its silhouette, brand identity, main illustration, palette and camera angle unchanged. Improve the contrast and spacing of the product name “[EXACT PRODUCT NAME]”. Use this exact approved front copy: [COPY]. Remove garbled small text rather than inventing replacements. Return one complete pouch on the same plain background.
Create the next SKU
Show / hide full prompt
Use the attached approved concept as the base for ONE new SKU. Keep the pouch shape, logo position, type hierarchy, illustration style and layout consistent. Change only the variant to “[NEW VARIANT]”, the accent color to [COLOR] and ingredient illustration to [INGREDIENT]. Exact approved text: [COPY]. Do not show both SKUs together. Return one complete pouch.
Plan the back panel
Show / hide full prompt
Create a separate back-view concept matching the attached front design, pouch shape and palette. Use ONLY this approved back copy: [COPY]. Reserve clear unprinted areas for [BARCODE / INGREDIENTS / REQUIRED LABEL INFORMATION] if final content is not supplied. Do not invent legal wording, scannable codes or nutrition facts. Keep text clear of zipper, seals and folds. Return one full back-view pouch, not a front-and-back collage.
Worked example: turn a brand idea into a packaging brief
Illustrative exercise—not a customer project. “Dusk Orchard” is a fictional brand used here to show how to fill in the prompt. The target appearance below is a design brief, not a claim that an image has already been generated or a pouch manufactured.
Step 1: make the decisions before opening the AI tool
| Decision | Example answer |
|---|---|
| Product and customer | Roasted almonds for adult specialty-food shoppers. |
| Front copy | DUSK ORCHARD / ROASTED ALMONDS / SEA SALT / NET WT. 200 g. Illustrative copy only; confirm actual fill and labeling before use. |
| Format | Rectangular stand-up zipper pouch with bottom gusset; size to be confirmed by sample filling, not inferred from 200 g alone. |
| Style | Forest green and cream, restrained botanical illustration, matte-looking surface. |
| Commercial information | One initial SKU; ask the supplier to evaluate MOQ and print route after confirming the specification. |
Step 2: copy this filled-in prompt
Show / hide full prompt
Generate ONE photorealistic front-view packaging design concept for the fictional food brand DUSK ORCHARD. The product is roasted almonds for adult specialty-food shoppers.
Use a rectangular flexible stand-up pouch with a resealable zipper and a bottom gusset. Its exact dimensions are not yet confirmed: show plausible proportions, not a technical drawing or a guaranteed 200 g capacity.
Visual direction: deep forest green, warm cream and small muted-gold-colored accents. A restrained botanical illustration of almond branches with accurately shaped almond kernels. No transparent window. Matte-looking laminated film, natural flexible wrinkles, realistic side seals and a clear top seal above the zipper. Do not make the pouch look like kraft paper or a rigid box.
Print exactly these four lines in a clear hierarchy: DUSK ORCHARD / ROASTED ALMONDS / SEA SALT / NET WT. 200 g. Give the product name a prominent cream-colored area. Keep small text minimal and keep all wording away from seals, zipper and bottom folds. Do not add any other brand, claims, certification, barcode or nutrition panel.
Show one complete centered pouch, large in frame but with every edge visible, on a light warm studio background with a soft contact shadow. No loose almonds, bowls, hands, second pouch, collage or text outside the package.
Return one image at the highest available image resolution. This is a visual concept only, not production artwork. If lettering cannot be rendered accurately, keep the relevant area clean for manual typesetting rather than inventing words.
Step 3: assess the generated result against the brief
The intended result is one green stand-up pouch with a cream product-name panel, a subordinate almond illustration and four readable text lines. Compare your actual generated image with the checks below; do not approve it just because it looks polished.
| Check | If the image misses the brief |
|---|---|
| One complete flexible pouch, correct format | Ask for a single stand-up pouch; remove extra packages, cropped seals or rigid-box geometry. |
| Exact four lines of text | Request a text-only revision, then manually proofread. Rebuild the final text in the artwork file. |
| Product name readable at thumbnail size | Reduce illustration contrast behind the name and enlarge the clear title area. |
| No unintended window or metallic claim | Remove the invented feature; discuss actual materials separately. |
| Usable space for printing and sealing | Move important wording inward visually; use the approved dieline to set real margins later. |
Step 4: send a production enquiry, not only a picture
Attach the selected concept and approved copy. Explain the contents, intended 200 g fill, destination market, one-SKU plan, desired quantity, zipper preference and filling/sealing method. Ask Runlong to evaluate size, material, printing and artwork preparation. Confirm the actual bag with sample filling before treating its capacity or dimensions as settled.
Have a concept but not a print file?
Send your AI image with your product, pouch size and quantity per design. Runlong Pack can review the starting file and assess suitable basic layout or image-enhancement assistance. Complex original artwork and difficult-to-reconstruct details need separate review.
4. Mylar bag size reference: choose the canvas before the artwork
The following are supplied packaging reference sizes, not guaranteed fill capacities. The gram and pound labels describe the reference applications; they are not interchangeable capacity ratings for powders, gummies, nuts or other contents. Test your actual product, headspace and sealing allowance.
| Reference fill label | Format | W × H + G (mm) | Full unfolded bottom depth* |
|---|---|---|---|
| 1 g | Three-side-seal flat pouch | 70 × 100 | Not applicable |
| 1 g | Stand-up zipper pouch | 76 × 127 + 25 | 50 mm |
| 3.5 g | Stand-up zipper pouch | 100 × 127 + 25 | 50 mm |
| 7 g | Stand-up zipper pouch | 100 × 150 + 35 | 70 mm |
| 14 g | Stand-up zipper pouch | 130 × 210 + 40 | 80 mm |
| 28 g | Stand-up zipper pouch | 150 × 210 + 40 | 80 mm |
| 1 lb (about 454 g) | Stand-up zipper pouch | 360 × 350 + 50 | 100 mm |
| 3.5–7 g | Custom-shaped zipper pouch | Reference outline within 180 × 180 | Confirm format and usable space |
*How to read the bottom fold: G is the single-side fold. For example, 100 × 127 + 25 mm means 100 mm width, 127 mm height and a 25 mm single-side bottom fold—approximately 50 mm when that bottom fold is fully opened. The actual usable interior and standing footprint depend on the construction; confirm the drawing rather than relying on capacity labels.
The reference range lists digital printing from about 500 pieces. Certain small-format gravure specifications may require around 100,000 pieces: a small pouch can consume little film per piece while the production run still needs sufficient material. This is not a universal minimum for every size in the table, every artwork or every Mylar bag. Confirm dimensions, laminate, finish and quantities per design for a current quote.
For further sizing steps, use our packaging bag size guide. Do not infer usable dimensions from an AI image; its proportions may not match the numbers in your prompt.
5. Turn the selected concept into production artwork
- Confirm the structure first. Provide contents, desired protection, filling and sealing conditions, pouch format and final dimensions. Then request the correct dieline.
- Rebuild the information layer. Use editable brand and product text where possible. Proofread every word; replace AI-created barcodes with verified barcode artwork and validate the printed result.
- Place the design on the dieline. Keep essential content clear of the seals, zipper, folds, tear notches and hang hole. Follow the actual supplier’s bleed and safe-area instructions; do not guess a universal margin.
- Check image resolution at final size. A sharp screen mockup does not guarantee adequate printed detail. As an illustration, 1,200 pixels across 100 mm is about 305 pixels per inch before cropping. Confirm the artwork requirement with the printer; tiny AI text can remain incorrect even at high resolution.
- Confirm color and finish. Screen colors, photography and printed film can differ. Digital printing normally uses CMYK; do not assume exact Pantone matching. Specify strict brand-color needs before approval.
- Review a suitable sample or proof. Confirm what the sample represents: visual direction, printed film, finished pouch, or filling/sealing fit. See custom packaging sample options.
- Approve the final version in writing. Confirm text, barcode, dimensions, layout and relevant label information before production starts. An earlier AI image is not the final approval file.
Runlong can first assess JPG, PNG or AI-generated images, although editable print files are preferred. Image enhancement and basic layout assistance are normally available without a separate design-assistance charge where feasible; complex original design or unreliable reconstruction requires confirmation.
Windows, foil and metallic-looking artwork
A transparent viewing area cannot contain a continuous aluminum foil or metallized layer. A windowed front combined with a foil or metallized back can be evaluated, but it is not the same structure as an all-foil pouch. Confirm the actual front, back and bottom construction. An AI image of a clear window or holographic finish does not prove that the illustrated structure can be made or that it meets your barrier needs.
Plan multiple designs before choosing the print route
Keep a consistent logo position and information hierarchy across SKUs. Suitable digital projects can be evaluated for smaller or multi-design orders, while gravure requires artwork, color and cylinder-cost review. Do not assume ten different designs share the same minimum as one design. Compare the full specification using our digital versus gravure printing guide.
6. What to send for a Mylar bag design review
Product: [ ]
Sales country or region: [ ]
Fill weight and product dimensions/bulk volume: [ ]
Bag format and W × H + single-side fold: [ ]
Quantity for each design and total SKU count: [ ]
Material or protection requirements: [ ]
Zipper, window, hang hole or special finish: [ ]
Preferred design style: [ ]
Attached files: [AI concept / logo / approved copy / editable artwork]
Filling and sealing method: [ ]
Target delivery timing and destination: [ ]
If you do not know the size, say so and share your product details. A sample-filling check is more useful than choosing only from a gram label. If your design is unfinished, send the best current version and identify which parts you want to keep.
Mylar bag design with AI: frequently asked questions
Can AI create a print-ready Mylar bag design?
AI can create a useful visual concept, but the output is not automatically a print-ready file. Confirm the pouch structure and dimensions, use the supplier-approved dieline, rebuild and check text and barcodes, and approve the final artwork before production.
Can I send Runlong Pack an AI-generated image instead of an editable file?
Yes. JPG, PNG and AI-generated images can be assessed as starting references. Editable print files are preferred. Image enhancement and basic layout assistance are normally available where feasible; complex original design or difficult reconstruction requires separate confirmation.
What does +25 mean in a Mylar pouch size?
In the reference table in this guide, +25 means a 25 mm single-side bottom fold, approximately 50 mm when the bottom fold is fully opened. Confirm the final drawing and usable interior space; suppliers may describe gussets differently.
Does a 3.5 g Mylar bag fit every product weighing 3.5 g?
No. Required capacity depends on product volume, density, shape, headspace and the pouch construction. Use the listed size as a starting reference and confirm it with your actual product and sample filling.
What is the MOQ for the reference Mylar bag sizes?
The supplied reference range lists digital printing from about 500 pieces. Some small-format gravure specifications may require around 100,000 pieces. These are reference quantities, not one universal MOQ for every size or artwork; confirm the actual structure, dimensions, finish and quantity per design.
Can a metallic-looking Mylar bag have a clear window?
A clear viewing area cannot contain a continuous aluminum foil or metallized layer. A windowed front with a foil or metallized back can be evaluated. Confirm the complete structure and required product protection; a generated image does not prove feasibility or barrier performance.
Will printed colors match my AI image exactly?
Not necessarily. Screens, photography, film and printing processes can produce different appearances. Digital printing normally uses CMYK and does not automatically guarantee exact Pantone matching. Confirm strict color requirements and the appropriate proof or sample before production.
Turn your design idea into a custom packaging brief
Share your concept, product details, preferred pouch format and quantity per design. We can review suitable packaging and printing options and explain what is needed for the next artwork step.